Table of Contents
For the most part, Disney Plus consists of family-friendly content. However, some content available on the platform might be a little inappropriate for some audiences. Fortunately, Disney Plus has parental controls to protect younger eyes from more mature content.
Back in March of 2022, Disney Plus added a bunch of Marvel shows that had previously aired on Netflix including Daredevil, The Punisher, and more. And with those additions, the platform updated its parental controls, as their content became a little more mature.
Now, the company lets parents set the level of content that is allowed for certain profiles attached to the account. Additionally, users can set passcodes to protect their own profiles from being breached by prying eyes. Here’s what you need to know.
How to set content rating limits on Disney Plus

The main resource that parents have at their disposal on Disney Plus is the ability to set content rating limits on individual profiles. You can set limits for your kids at various levels, all the way from TV-Y up to TV-MA.
In fact, setting these content rating limits will stop any users from watching content at or above the limited rating on the individual profile.
You can set rating limits on both the Disney Plus website on your computer or through the mobile app.
Set content rating limits on the website
First, we’ll check out how to set content rating limits on a profile through the Disney Plus website. The process is pretty similar on both platforms, though the menus might look a little different.
Start by heading to the Disney Plus website and logging into your account.
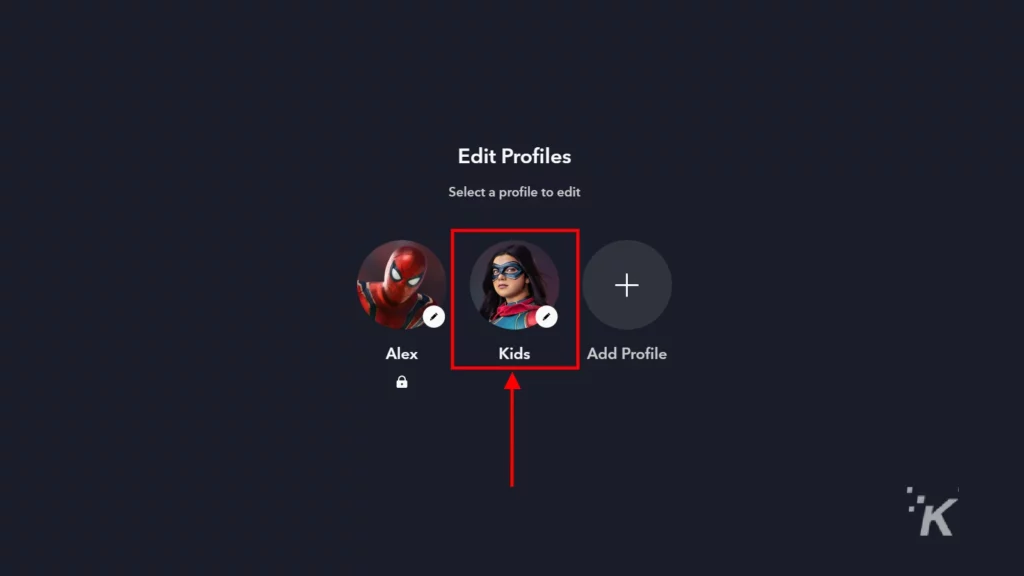
- Click your profile picture in the top right

- Select Edit Profiles

- Select the profile you wish to add controls to (this is where you can create a new profile if you want)
- At the bottom, select Content Rating
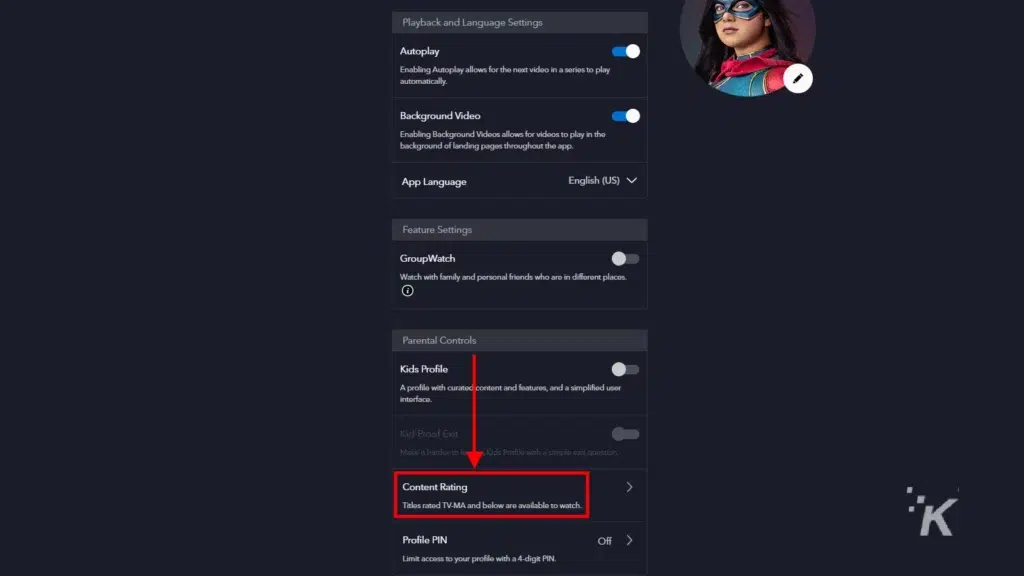
- Enter your password, then Continue

- Choose the content rating you want then click Save

So there you go. As you can see, you’ll be able to set your content rating limits at varying levels, depending on the kind of content that you want your kids to be able to see.
Set content rating limits on the mobile app
If you primarily use the Disney Plus app on your mobile device, don’t worry. You can also set content rating limits through the mobile app, though the menus could look a little different.
Start by downloading the Disney Plus app on your iOS or Android device and log into your account.
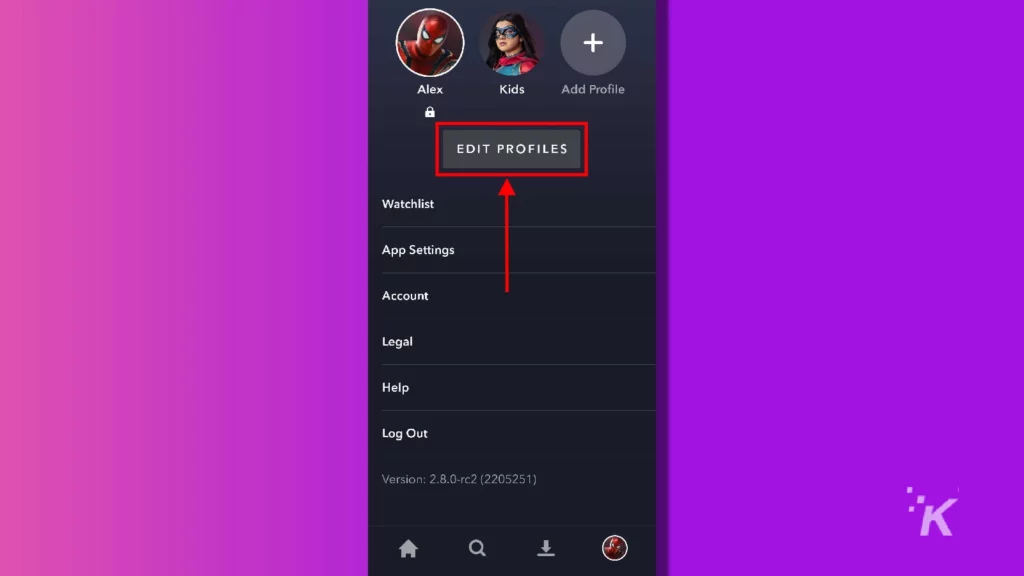
- Tap your profile picture in the bottom right

- Tap Edit Profiles
- Select the profile you wish to add parental controls to (this is where you can create a new profile if you want)
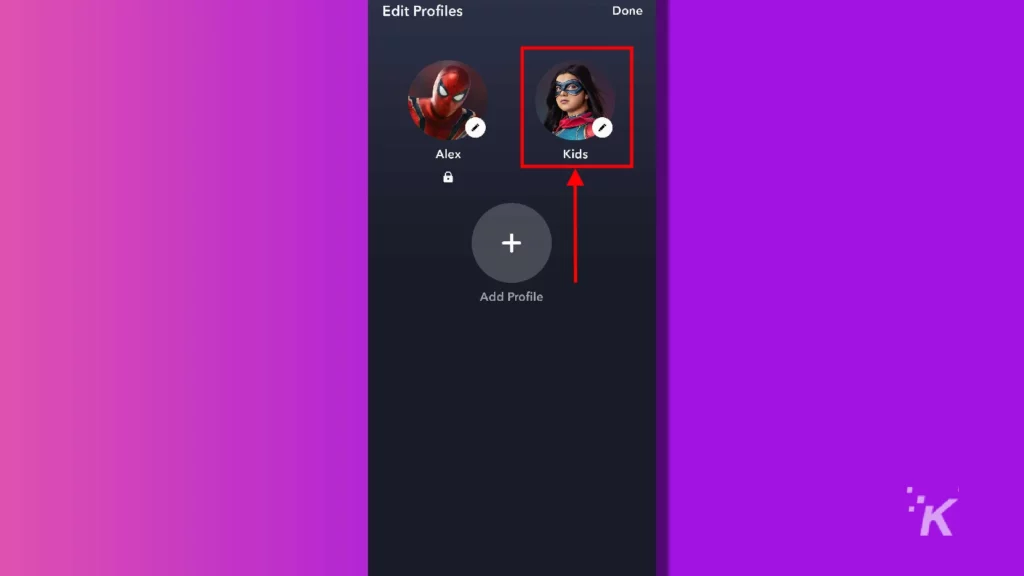
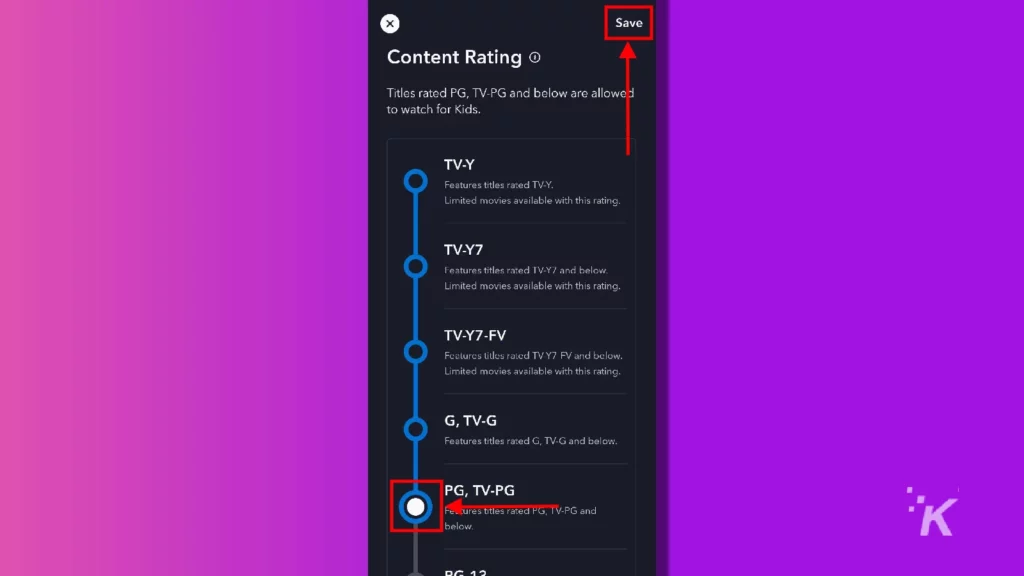
- At the bottom, select Content Rating

- Enter your password and select Confirm
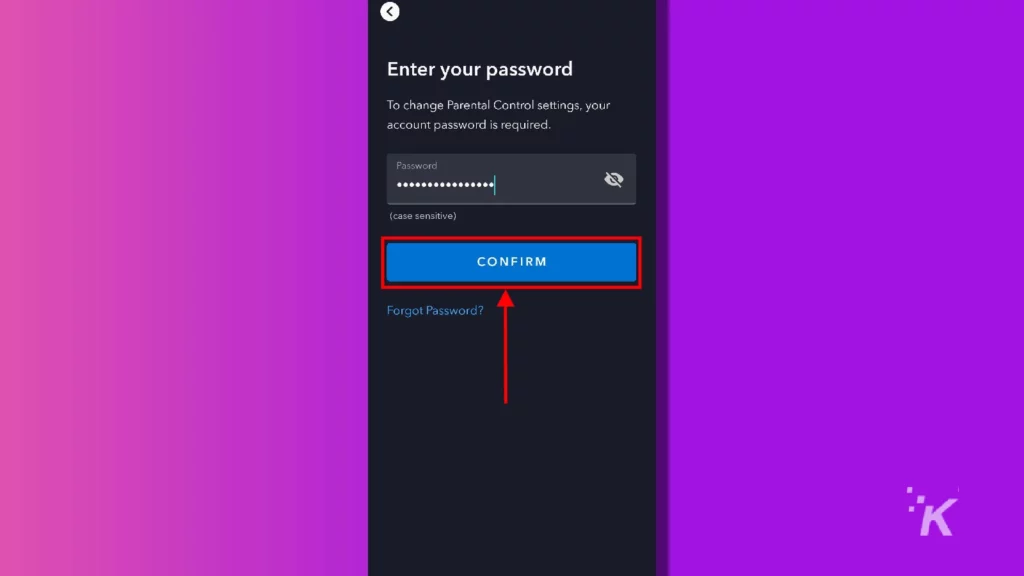
- Select your preferred content rating and tap Save at the top right
That’s all you have to do. Now, whenever a person goes to watch content on that profile, the parental controls will kick in and limit the available content accordingly.
How to use the Kid’s Profile parental control in Disney Plus

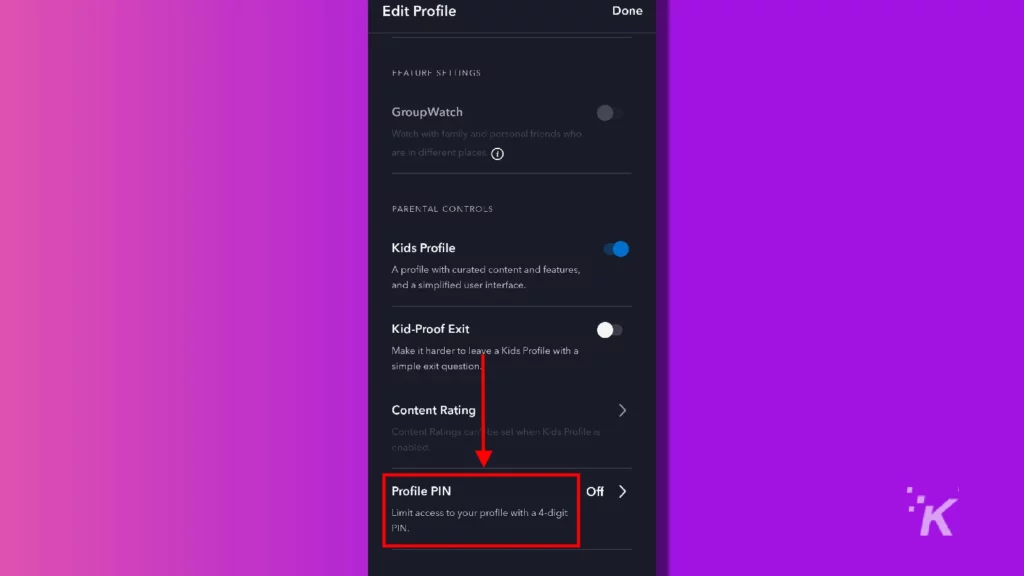
Another feature available on Disney Plus is the ability to create a “Kid’s Profile.” When you label a profile as a Kid’s Profile, the platform will automatically limit its content to anything considered suitable for all viewers.
Additionally, the Kid’s Profile feature changes the platform’s interface to a much more kid-friendly interface that’s easy to navigate.
There’s also an option that requires the viewer to complete a sort of captcha before exiting a Kid’s Profile to help ensure that your kids aren’t exiting and hopping into other profiles unnoticed.
Again, you can set up a Kid’s Profile on either the Disney Plus website or through the platform’s mobile app.
How to set up a Kid’s Profile on the website
First, we’ll check out the Kid’s Profile feature on the Disney Plus website. Setting up a Kid’s Profile is pretty simple and can be done to any profile (aside from the primary one), even after it has been created.
Start by logging into your account on the Disney Plus website.
- Click your profile picture in the top right
- Select Edit Profiles
- Choose the profile you wish to change into a Kid’s Profile
- Near the bottom, toggle the Kid’s Profile option on

That’s all there is to that. After you toggle the Kid’s Profile option on, you will have the option to toggle on Kid-Proof Exit.
This will require a simple captcha-like entry before you are able to switch to another profile. If you want to turn this option on, you’ll have to confirm the change with your password.
How to set up a Kid’s Profile on the mobile app
Now we can check out how to set up the Kid’s Profile parental control option on the Disney Plus mobile app. Fortunately, the process is pretty similar, though the menus might look a little different.
Start by downloading the Disney Plus app for iOS or Android and log into your account.
- Tap your profile picture in the bottom right
- Select Edit Profiles
- Select the profile you wish to add Kids Mode to (this is where you can create a new profile if you want)
- Swipe down and toggle the Kids Profile option on

You won’t have to confirm your password to change to a Kid’s Profile, but you might have to confirm it if you wish to change back to a normal profile.
Again, you can add the Kid-Proof Exit option to require a small, captcha-like input before a user can switch from the Kid’s Profile to another profile on the account.
How to add a PIN to your Disney Plus profile
The last parental control option available on Disney Plus is the ability to add a PIN to your profile. The streaming service will let you add 4-digit PINs to individual profiles within the Disney Plus account.
While this isn’t necessarily parental control in terms of monitoring a child’s use of a profile, it will lock others out of that profile if they don’t have the PIN. Without that, they’ll be required to use another profile or they won’t be able to use the account at all.
This process is very similar to the other parental control processes mentioned above. And, like the others, you can do it either through the Disney Plus website or through the iOS or Android mobile app.
How to add a PIN to your Disney Plus profile on the website
First, we’ll check out how to add a PIN through the Disney Plus website. The first few steps are exactly the same as the other parental control options above.
As always, start by heading to the Disney Plus website and logging into your account.
- Click your profile picture on the top right
- Select Edit Profiles
- Choose the profile you wish to add a PIN to
- Scroll down and click Profile PIN

- Enter your password and select Continue
- Check the box and enter a PIN. Click Save when you’re finished

And there you go. Once you add a PIN to your profile, you’ll have to enter the 4-digit number anytime you wish to watch content from that account.
Again, this is another layer of security that you can add to keep your nosy kids from peeping content they’re not supposed to see.
How to set a PIN to your Disney Plus profile on the mobile app
And finally, you can set up a PIN for your Disney Plus profile using the mobile iOS or Android app. If you’ve been following along with this guide, the steps for this process will be pretty familiar.
As always, start by downloading the Disney Plus app for iOS or Android and logging into your account.
- Select your profile picture in the bottom right
- Select Edit Profiles
- Choose the profile you wish to add a PIN to
- Scroll to the bottom and select Profile PIN
- Enter your password and tap Confirm
- Toggle the Profile PIN option on and enter a PIN. Tap Save at the top right to confirm

Now your account will have an extra layer of security thanks to the 4-digit passcode. You’ll have to enter the PIN every time you want to watch content from that profile, but no one else will be able to access it without the PIN.
Secure your Disney Plus profiles with parental controls
So there you have it. As you can tell, Disney Plus offers several options for parental control and security. Whether you want to limit the content rating for your kids or create a Kid’s Profile tailored specifically for young ones, Disney Plus will let you do it.
You can also add a 4-digit PIN to each individual profile within an account. So you’ll have an extra layer of protection to help keep your kids away from the content you don’t want them to see.
Fortunately, setting up parental controls on Disney Plus is relatively simple, as long as you know where to look.
Have any thoughts on this? Let us know down below in the comments or carry the discussion over to our Twitter or Facebook.
Editors’ Recommendations:
Just a heads up, if you buy something through our links, we may get a small share of the sale. It’s one of the ways we keep the lights on here. Click here for more.